Hello Friends!
Today I have a Do It Yourself design. This is a very easy and an interesting method to decorate your nails. You can match it with any dress and for any occasion.
The time consuming part of nail art is drying each layer of nail paint before we put the next layer right? Here is something interesting for you where you need not wait until the intermediate coats dry. Yes it’s called “Drag Marble”!
Here is a step by step reference guide with photos.
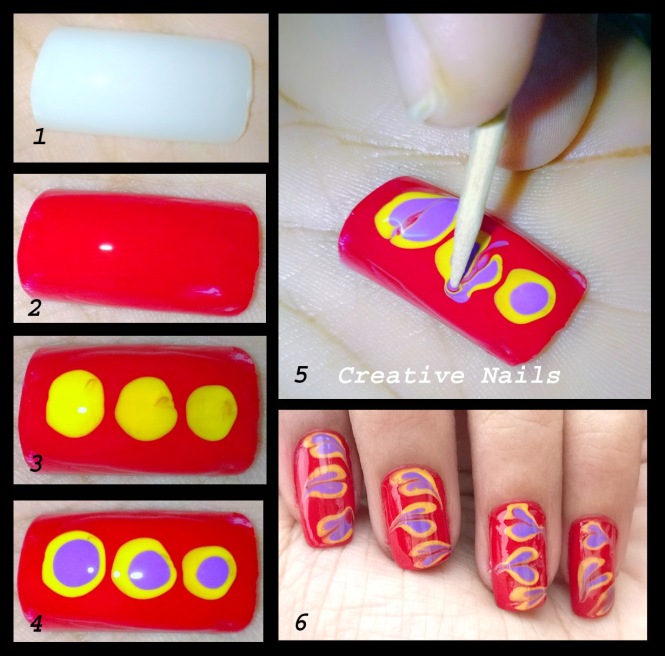
Step 1: Apply the clear base coat (colourless polish) and let it dry as shown in photo (1).
Step 2: Apply a thick layer of red color and do not let it dry as shown in photo (2).
Step 3: Immediately put some yellow dots as shown in photo (3). Do not let it dry.
Step 4: Put some purple dots on yellow dots as shown in photo (4). Do not let it dry.
Step 5: Now take a tooth pick and drag the polish with the pointed edge as shown in photo (5).
Step 6: Let the entire mani dry and then finish it with a top coat (Colourless polish).
Do It Yourself (DIY) Nails
Isn’t it easy, beautiful and a perfect mani for any occasion? You can change the color combo as required.

Drag Marble!
Creative Nails will be back with many more DIY designs for you. Till then, enjoy the drag marbles with Creative Nails. 🙂

Awesome tutorial! I’m going to try this drag marble soon 😀
LikeLiked by 1 person
Thanx! would like to see it when done 🙂
LikeLike
Fab design!!! ❤
LikeLiked by 1 person
Thanx alot!
LikeLike
Wow…. Such an easy way to create hearts… Perfect for Valentine’s…. 😊
LikeLiked by 1 person
Oh ya I dint think in that way!! 🙂
LikeLike
Very pretty design
LikeLiked by 1 person
Thanx!
LikeLike
It came out so well 👌
LikeLiked by 1 person
Thanx Ani!
LikeLike
Looks simple,I want to try.
LikeLiked by 1 person
Yeh you should try. I would be happy to see it 🙂
LikeLike
Wow that looks really cool 🙂
LikeLiked by 1 person
thanx 🙂 🙂
LikeLike
Really Awsum..
LikeLiked by 1 person